Tuesday 18 November 2014

Zombie Makeup Tips Makeup Tips for Brown Eyes and Tricks Smokey Eye Eyeliner For Blue Eyes Eyeliner and Mascara Tumblr Photos

Zombie Makeup Tips Biography

Source (google.com.pk)

Prep your face. You'll want to start with a clean canvas, so use a gentle cleanser to remove makeup and oils from your skin. Rinse with warm water, then pat (don't rub) your face dry with a towel. Don't put on moisturizer or sunscreen. These products might cause latex-based makeup to slide off.
Pull your hair back. If you have long hair or bangs, keep it out of your face while you work. Put it up into a ponytail, and clip stray hairs out of the way with bobby pins or a headband.
If you're a guy, you may want to shave before applying any make-up or prosthetics. Latex and gelatin can get stuck in the hair, making it them quite painful to remove. Plus, if you're dead your hair doesn't grow. Duh.
Apply latex or gelatin to create wounds and gashes (optional). Liquid latex and gelatin are two substances you can use to create really cool zombie effects - like open wounds, bloody gashes, bite marks and broken noses. Although they might sound intimidating or overly complicated to use, both liquid latex and gelatin are actually surprisingly easy to work with. An explanation of how both products work can be found in parts three and four of this article.
If you do decide to work with either liquid latex or gelatin, they will need to be applied at this point in the make-up process, that is, before you begin working with face paints.
However, if you decide these products are too much work or you don't have time to find them, just skip to the next step. You can still create a hideously decayed zombie look without them!
Apply a base of white face paint or stage make-up. Using a soft makeup or stippling sponge, dab the white all over your face. Then blend it in small, light motions until your whole face is covered in a thin layer of makeup. Allow it to dry completely.
Create a mottled effect by subtly applying a second color over the white. You can go with grey for an ashen, decayed effect, red or purple for a bruised effect or green and yellow for a gangrenous effect.
Use the best quality face paint you can find. Cheap, low-quality face paint will not blend well and is bad for your skin. Try to get your hands on some high-quality stage make up - it can usually be found in good costume stores.
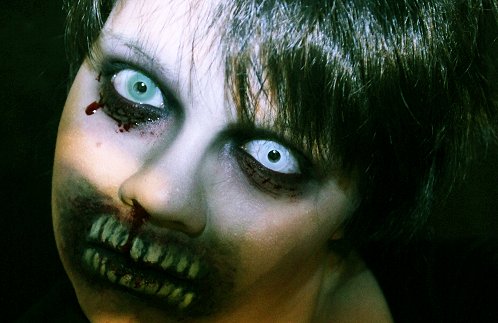
Create dark circles around your eyes. Dark, sunken eyes can help you look dead, violently injured, sleep-deprived, or all of the above!
Outline your lids with dark pencil eyeliner, then smudge it outward. Then use black or brown eyeshadow or face paint to fill in the dark circles beneath the eyes and around the eyelids.
Blend around the edges with purple and red paint or shadow to create the illusion of freshly-bruised skin, or with green and yellow for an older looking bruise.
Hollow out your cheeks. Zombies are often pretty emaciated looking - good brains can be hard to come by you know! You can achieve this sunken in effect by sucking in your cheeks and lightly blending some black powder or paint into the hollows. This will highlight your cheekbones.
Darken your lips. Apply black lipstick or face paint to your lips for a dried-out, dead look. Also emphasize the creases around your mouth with some dark, shadowy lines.
Create popping veins and bloody scratches. Use a small paintbrush to paint thin, zig-zagged lines in blues and purples all over the face to create popping veins. Take a dry stippling sponge (or some other coarse sponge) and dip it in red face paint. Draw the sponge lightly over the skin to create a bloody-looking scratch.
Finish with some fake blood. You can buy fake blood at most costume stores, or you can make your own non-toxic version simply by adding some red food coloring to corn syrup. For all the fake blood you'll ever need, mix one cup of corn syrup with one or two tablespoons of red food coloring. For darker, more realistic looking, you can also add one or two drops of blue food coloring.
Apply the blood to your hairline and let it drip down your face, or cup some blood in your hand and dip your mouth in to make it look like you just fed!
Use a toothbrush for blood spatter. Put some fake blood onto a toothbrush, aim the bristles at your face, and run your finger over the bristles from bottom to top.
Create a dripping blood effect. Dip a sponge into the fake blood and squeeze it over your skin. The blood should run into a natural-looking drizzle.

Zombie Makeup Tips Makeup Tips for Brown Eyes and Tricks Smokey Eye  Eyeliner For Blue Eyes Eyeliner and Mascara Tumblr Photos

Zombie Makeup Tips Makeup Tips for Brown Eyes and Tricks Smokey Eye  Eyeliner For Blue Eyes Eyeliner and Mascara Tumblr Photos

Zombie Makeup Tips Makeup Tips for Brown Eyes and Tricks Smokey Eye  Eyeliner For Blue Eyes Eyeliner and Mascara Tumblr Photos

Zombie Makeup Tips Makeup Tips for Brown Eyes and Tricks Smokey Eye  Eyeliner For Blue Eyes Eyeliner and Mascara Tumblr Photos

Zombie Makeup Tips Makeup Tips for Brown Eyes and Tricks Smokey Eye  Eyeliner For Blue Eyes Eyeliner and Mascara Tumblr Photos

Zombie Makeup Tips Makeup Tips for Brown Eyes and Tricks Smokey Eye  Eyeliner For Blue Eyes Eyeliner and Mascara Tumblr Photos

Zombie Makeup Tips Makeup Tips for Brown Eyes and Tricks Smokey Eye  Eyeliner For Blue Eyes Eyeliner and Mascara Tumblr Photos

Zombie Makeup Tips Makeup Tips for Brown Eyes and Tricks Smokey Eye  Eyeliner For Blue Eyes Eyeliner and Mascara Tumblr Photos

Zombie Makeup Tips Makeup Tips for Brown Eyes and Tricks Smokey Eye  Eyeliner For Blue Eyes Eyeliner and Mascara Tumblr Photos

Zombie Makeup Tips Makeup Tips for Brown Eyes and Tricks Smokey Eye  Eyeliner For Blue Eyes Eyeliner and Mascara Tumblr Photos

Zombie Makeup Tips Makeup Tips for Brown Eyes and Tricks Smokey Eye  Eyeliner For Blue Eyes Eyeliner and Mascara Tumblr Photos

Applying Makeup Tips Makeup Tips for Brown Eyes and Tricks Smokey Eye Eyeliner For Blue Eyes Eyeliner and Mascara Tumblr Photos

Applying Makeup Tips Biography

Source (google.com.pk)

Remove any old makeup. When you’re applying makeup, it is necessary to start with a clean palette. Therefore, remove any of last nights makeup that you might have slept on, or wash off makeup from earlier on in the day. If you try to apply more makeup over the top of old makeup (not including touch ups), your end look will look caked on and more unnatural than makeup put on a fresh face.
Keep in mind that you should always remove your makeup at the end of the day; sleeping with your makeup on can clog your pores and cause blemishes and wrinkles
Wash your face. For the same reason you remove your old makeup, you should also wash your face; leaving grease and sweat on your face can give a fresh cover of makeup a shiny, caked on look after several hours. Use a face detergent to gently wash your face, spending about one minute of scrubbing to remove all bacteria and dead skin cells in your pores. Finish up by applying a facial moisturizer. Dry skin will look flaky to start with and gain oil to compensate later on, so be sure your skin has been treated with a bit of lotion.
Apply your concealer. The purpose of concealer is to even out uneven skin tone as a result of blemishes or dark under-eye circles. Use a concealer brush or your (clean) fingertips to blend concealer on your bottom eyelids, on any red patchy areas, or over any acne or dark spots. Blend the edges of your concealer spots so avoid having discolored marks around your face.
Put on a coat of foundation. There are several types of foundation, but they are generally applied the same way. Liquid, cream, and powder foundations all act to create a totally even complexion, working to blend your natural skin tone with the concealer you’ve already applied. Use a foundation brush to apply foundation to the entirety of your face, blending into your neck and earlobes if necessary. Keep in mind that your foundation should be the same color as your natural skin tone, not much darker or lighter. Your foundation should go over the top of the areas that have concealer to blend them.
You can use a concealer brush to add a little extra foundation to cover up stubborn blemishes.
Liquid foundation can be applied with your fingertips, although this is more likely to introduce bacteria to your skin and cause future breakouts
Set your foundation. This step is optional, but if you’re looking for long-lasting makeup you can use a setting powder to hold your foundation and concealer in place. Use a large, fluffy brush to cover your whole face in a neutral or matching setting powder. This step is particularly important or useful if you’re using liquid foundation, as it will help to set the foundation and remove any sheen that might be making an appearance.
Apply a highlighter. With your foundation completed, it is likely that your face now looks contour-less and flat because of the uniform color. In order to provide some depth, you’ll need to create the illusion of highlights and shadows. Use a cream or powder highlighter to brighten up the deepest areas of your face: the inside corners of your eyes, underneath your eyebrows, in the center of your cupid’s bow, and on the tops/sides of your cheekbones. This will make your face look more bright and awake than it would otherwise.
Create a ‘3’ shape on your cheekbones, into your eyebrows, and up to your forehead for the perfect highlight.
You can use your fingers or a small highlighter brush to apply the highlighter.
Add depth with contouring. The opposite of bringing out the highlights on your face, contouring involves adding a powder that is a few shades darker than your actual skin tone (different than a bronzer) to the areas you want to look minimized or further away. Typically, you should contour under your cheekbones in the hollows of your cheeks, and on the sides of your nose. This will make your face look thinner and longer in appearance, and provide the shadows that naturally occur without foundation.
Apply a little blush. The final step in prepping your face is to add blush to your cheeks. Everyone’s cheeks have a bit of color, but this color varies for every person. Apply your blush with with large brush on the apples of your cheeks (the round part that forms when you smile). Don’t go too heavy with your blush, just add enough to replenish the color that would form naturally.
Fill in your eyebrows. This step is optional depending on the fullness of your eyebrows, but is generally recommended for those who have thin or sparse eyebrows. Select a color of brow pencil or powder that is close to your natural hair color. Start by outlining the edges of your eyebrows, and then fill in the center with a bit of color. Use short strokes that mimic the look of your hair, going in the same direction of your hair growth.

Applying Makeup Tips Makeup Tips for Brown Eyes and Tricks Smokey Eye  Eyeliner For Blue Eyes Eyeliner and Mascara Tumblr Photos

Applying Makeup Tips Makeup Tips for Brown Eyes and Tricks Smokey Eye  Eyeliner For Blue Eyes Eyeliner and Mascara Tumblr Photos

Applying Makeup Tips Makeup Tips for Brown Eyes and Tricks Smokey Eye  Eyeliner For Blue Eyes Eyeliner and Mascara Tumblr Photos

Applying Makeup Tips Makeup Tips for Brown Eyes and Tricks Smokey Eye  Eyeliner For Blue Eyes Eyeliner and Mascara Tumblr Photos

Applying Makeup Tips Makeup Tips for Brown Eyes and Tricks Smokey Eye  Eyeliner For Blue Eyes Eyeliner and Mascara Tumblr Photos

Applying Makeup Tips Makeup Tips for Brown Eyes and Tricks Smokey Eye  Eyeliner For Blue Eyes Eyeliner and Mascara Tumblr Photos

Applying Makeup Tips Makeup Tips for Brown Eyes and Tricks Smokey Eye  Eyeliner For Blue Eyes Eyeliner and Mascara Tumblr Photos

Applying Makeup Tips Makeup Tips for Brown Eyes and Tricks Smokey Eye  Eyeliner For Blue Eyes Eyeliner and Mascara Tumblr Photos

Applying Makeup Tips Makeup Tips for Brown Eyes and Tricks Smokey Eye  Eyeliner For Blue Eyes Eyeliner and Mascara Tumblr Photos

Applying Makeup Tips Makeup Tips for Brown Eyes and Tricks Smokey Eye  Eyeliner For Blue Eyes Eyeliner and Mascara Tumblr Photos

Applying Makeup Tips Makeup Tips for Brown Eyes and Tricks Smokey Eye  Eyeliner For Blue Eyes Eyeliner and Mascara Tumblr Photos

Natural Makeup Tips Makeup Tips for Brown Eyes and Tricks Smokey Eye Eyeliner For Blue Eyes Eyeliner and Mascara Tumblr Photos

Natural Makeup Tips Biography

Source (www.google.com.pk)

Expert tips for fresh, flawless makeup that looks, well, like you’re not wearing makeup.

How to Get the Look: Perfect Your Skin
So that makeup blends in easily‚ first wash with cleanser and a cloth to gently exfoliate your face, says Tom Pecheux‚ creative makeup director for Estée Lauder.
1. Moisturize and Even Out Skin Tone
The fastest, most natural way to do this is with a tinted lotion, like La Mer The SPF 18 Fluid Tint, which also contains sun protection ($70, saks.com). Because it’s sheer, you don’t have to match it to your skin exactly, as you have to do with foundation. You can even go slightly deeper to warm up your complexion, says New York City makeup artist Polly Osmond. Apply it like a basic moisturizer.
2. Conceal Any Flaws
For visible breakouts or deep undereye circles, use a pigment-rich concealer, like Chanel Long Lasting Corrective Concealer ($40, chanel.com). Its small applicator deposits just the right amount of makeup, which is key. “The trick is not to use too much concealer,” says Osmond. “That just accentuates problem areas.” For blemishes, dab, blend, and build up coverage in thin layers. For dark circles, swipe the wand under your eyes, then pat with a finger to blend.
Some days you want your makeup to look natural and not too “done” – at a low-key work lunch, during morning carpool, or when you’re wearing a really fancy outfit, for example.

But going bare-faced is probably not what you had in mind! With the right products and techniques, you can make the most of your natural beauty without wearing a ton of makeup.

STEP 1: Prep the Palette

Great makeup always starts with fresh skin. To fool them into thinking your luminous skin is nature’s gift, start by washing, toning, and moisturizing your face.

“Also, drink lots of water to plump the skin from the inside,” says Pittsburgh-based makeup artist Patty Bell. Skin cells are made of mostly water, and if you're dehydrated, your skin will look and feel dry, too.

Bonus tip: Don’t skimp on sunscreen just because you’re going for lighter makeup. The best choice is a lightweight, oil-free sunscreen with at least SPF 30.

STEP 2: Step Off Base

Skip the heavy foundation and even out your skin with a healthy dose of sheer color from a tinted moisturizer or BB cream.

“Applying your makeup with your fingers or makeup sponges instead of brushes will also create a more natural look,” says Mary Schook, a New York esthetician and makeup artist. Use freshly washed fingertips! Next, finish by applying translucent powder -- but only where you need it, mostly around the forehead, nose, and chin.

Bonus tip: Use a light-reflecting concealer pen on dark or red areas -- around your nose, under your eyes, on your chin. Light-reflecting concealers hide small-to-moderate imperfections without caking up.

STEP 3: Fake a Natural Flush

Work with the tones in your skin. Find a creamy blush that matches your skin’s natural flush, like after you exercise.

Or you can use your lip tone as a guide. In general, powder pinks work for fair skin tones, peachy pinks work for medium skin, and brownish pinks work for darker skin.

“Blend a dot of the blush into areas where the sun would fall on your face -- apples of your cheeks, chin, forehead, and bridge of nose,” Schook says. 

Bonus tip: For the most natural-looking flush, avoid makeup with a lot of shimmer or sparkle, which comes off as overdone. Pat the blush onto your cheeks and other areas, and then blend outward. You could also use the same cream blush on your lips.
STEP 4: Open Your Eyes

Give lashes a subtle boost by curling them and then swiping them with one coat of brown or dark brown lengthening mascara. This is a good time to give your regular black mascara a break -- you just want to add a little contrast, not drama, to your eyes.

For your lids, “you can still use a shadow and look natural,” Schook says. “Just use cream shadows in skin-tone-friendly shades instead of powders that can sit on the skin and make it look like you are wearing makeup.”

Bonus tip: If you have sparse brows or gaps to fill in, use a stiff brush to apply brow powder for a natural and subtle arch. And if you can’t leave home without eyeliner, smudge a little into the outer corners of your eye.

STEP 5: Pucker Up

Polish off your no-makeup look with a swipe of lip gloss in a color that’s just one shade brighter than your natural lip color. Even better? New York makeup artist Denise Del Russo recommends using a color-adjusting gloss. The shade changes to suit your individual skin tone when you apply it.

Bonus tip: Mist your skin with a weightless makeup-setting spray after you finish applying. Use the spray throughout the day to help your makeup stay fresh.

Natural Makeup Tips Makeup Tips for Brown Eyes and Tricks Smokey Eye  Eyeliner For Blue Eyes Eyeliner and Mascara Tumblr Photos

Natural Makeup Tips Makeup Tips for Brown Eyes and Tricks Smokey Eye  Eyeliner For Blue Eyes Eyeliner and Mascara Tumblr Photos

Natural Makeup Tips Makeup Tips for Brown Eyes and Tricks Smokey Eye  Eyeliner For Blue Eyes Eyeliner and Mascara Tumblr Photos

Natural Makeup Tips Makeup Tips for Brown Eyes and Tricks Smokey Eye  Eyeliner For Blue Eyes Eyeliner and Mascara Tumblr Photos

Natural Makeup Tips Makeup Tips for Brown Eyes and Tricks Smokey Eye  Eyeliner For Blue Eyes Eyeliner and Mascara Tumblr Photos

Natural Makeup Tips Makeup Tips for Brown Eyes and Tricks Smokey Eye  Eyeliner For Blue Eyes Eyeliner and Mascara Tumblr Photos

Natural Makeup Tips Makeup Tips for Brown Eyes and Tricks Smokey Eye  Eyeliner For Blue Eyes Eyeliner and Mascara Tumblr Photos

Natural Makeup Tips Makeup Tips for Brown Eyes and Tricks Smokey Eye  Eyeliner For Blue Eyes Eyeliner and Mascara Tumblr Photos

Natural Makeup Tips Makeup Tips for Brown Eyes and Tricks Smokey Eye  Eyeliner For Blue Eyes Eyeliner and Mascara Tumblr Photos

Natural Makeup Tips Makeup Tips for Brown Eyes and Tricks Smokey Eye  Eyeliner For Blue Eyes Eyeliner and Mascara Tumblr Photos

Natural Makeup Tips Makeup Tips for Brown Eyes and Tricks Smokey Eye  Eyeliner For Blue Eyes Eyeliner and Mascara Tumblr Photos

Professional Makeup Tips Makeup Tips for Brown Eyes and Tricks Smokey Eye Eyeliner For Blue Eyes Eyeliner and Mascara Tumblr Photos

Professional Makeup Tips Biography

Source (www.google.com.pk)

Did you know that there are some professional makeup tips that can make a big difference in your look? Knowing which makeup brushes you really need and implementing new colors can make a big difference in your look.

It’s always fun to discover new ways to use the products you already have and find new ones –airbrush makeup – to experiment with. Keep the following tips in mind when you are making changes in your makeup routine.
Professional Makeup Brushes

Professional makeup tips always suggest using one or two pro makeup brushes. Why? There’s a big difference between professional brushes and the ones that come with your makeup. You can easily tell the difference by comparing two of the same type of brushes when you apply your makeup.
1. Professional makeup brushes contain more hairs – denser – and they are shaped differently.

2. They enable a makeup artist to apply perfectly placed color very quickly.

3. They require less product and so you save money

Not all professional makeup brushes are expensive. If you are just starting out try a professional brush like the one used for the easy eyeshadow technique. An angled eye makeup brush will make you a believer! Then add a blush brush and a foundation brush. Those are the ones that make the biggest difference.

Airbrushed Makeup

There are airbrushes and there is airbrushed makeup. Did you know that some of the foundations applied with an airbrush can also be applied without it? Not only that, but that it gives a smooth even finish almost as good as the airbrush? It’s true and pros know it. In fact, the same makeup applied with a foundation brush or makeup sponge can give you coverage that looks very similar.

These three professional makeup tips will help you get your airbrushed makeup right every time:

1. Start with a home spray-on makeup to practice with.

2. Always blend with a sponge afterward.

3. Consider airbrush makeup an investment and buy the best you can afford. Complete airbrush kits are the best.
Pro Color Selection

When you want beautiful color with more pigment then shop where the pros shop – Online. The online makeup suppliers offer the best deals in makeup and the best color selection. You can find makeup palettes at a reasonable price which contain a number of colors.

Most of these suppliers also offer professional makeup tips for using and mixing their products because professional makeup is designed to be mixed with other makeup.

You can take richly pigmented foundation and make it sheer with a moisturizer.
Tiny amounts of cover makeup products like concealers will cover any type of discoloration. That means you don’t have to pile it on. You can use a spot cover technique.
The makeup has more color pigment in it which means that if you are having your photo taken the color won’t looked washed out.
The best part of buying professional makeup products online is the diversity and the fact that most of the time it is in stock. No more running to the makeup counter only to be told that your favorite product is out.
If you’re addicted to makeup take some time to explore a few of the professional makeup lines. You’ll find beautiful natural colors, too. If you only choose one of these professional makeup tips to follow then treat yourself to a new professional makeup brush. It’s worth it!

Professional Makeup Tips Makeup Tips for Brown Eyes and Tricks Smokey Eye  Eyeliner For Blue Eyes Eyeliner and Mascara Tumblr Photos

Professional Makeup Tips Makeup Tips for Brown Eyes and Tricks Smokey Eye  Eyeliner For Blue Eyes Eyeliner and Mascara Tumblr Photos

Professional Makeup Tips Makeup Tips for Brown Eyes and Tricks Smokey Eye  Eyeliner For Blue Eyes Eyeliner and Mascara Tumblr Photos

Professional Makeup Tips Makeup Tips for Brown Eyes and Tricks Smokey Eye  Eyeliner For Blue Eyes Eyeliner and Mascara Tumblr Photos

Professional Makeup Tips Makeup Tips for Brown Eyes and Tricks Smokey Eye  Eyeliner For Blue Eyes Eyeliner and Mascara Tumblr Photos

Professional Makeup Tips Makeup Tips for Brown Eyes and Tricks Smokey Eye  Eyeliner For Blue Eyes Eyeliner and Mascara Tumblr Photos

Professional Makeup Tips Makeup Tips for Brown Eyes and Tricks Smokey Eye  Eyeliner For Blue Eyes Eyeliner and Mascara Tumblr Photos

Professional Makeup Tips Makeup Tips for Brown Eyes and Tricks Smokey Eye  Eyeliner For Blue Eyes Eyeliner and Mascara Tumblr Photos

Professional Makeup Tips Makeup Tips for Brown Eyes and Tricks Smokey Eye  Eyeliner For Blue Eyes Eyeliner and Mascara Tumblr Photos

Professional Makeup Tips Makeup Tips for Brown Eyes and Tricks Smokey Eye  Eyeliner For Blue Eyes Eyeliner and Mascara Tumblr Photos


Professional Makeup Tips Makeup Tips for Brown Eyes and Tricks Smokey Eye  Eyeliner For Blue Eyes Eyeliner and Mascara Tumblr Photos

Makeup Tips For Eyes Makeup Tips for Brown Eyes and Tricks Smokey Eye Eyeliner For Blue Eyes Eyeliner and Mascara Tumblr Photo

Makeup Tips For Eyes Biography

Source (www.google.com.pk)

I'm always dumbfounded by women who're able to transform themselves into entirely new people with a little (or, more appropriately, a lot) of makeup. More specifically, over the years, I’ve come across a large assortment of before-and-after pictures online of young Asian women who’ve managed to alter every aspect of their faces, from the shape of their eyes to the color of their complexion, just with makeup—so much so, there's hardly an ounce of who they are naturally beneath the black liner and liquid foundation. And it seems they do it all in the name of being more “beautiful.” But who's to say what beauty is? Is not looking like yourself beautiful?

With those questions in mind, I decided to find a way for women with Asian eyes (or monolids, or whatever type of lids, really) to do their eye makeup without abandoning what makes them uniquely beautiful. After doing some research, I learned these tricks—none of which require fake lashes, gel liner, and skin glue:

Tip 1: Don’t default to black liner. Many women, regardless of their skin tone and hair color, believe a black eye is perfectly acceptable—not to mention sultry and "mysterious" even. I used to be guilty of this, though, as my friends even called me the raccoon in high school. But over the years, I’ve come to realize that black liner can, in fact, be too harsh for most women. If not applied judiciously and strategically, it can make your eyes appear smaller, and you could end up looking ghoulish. Yikes.

Tip 2: "Tightline" your top lash lines with brown. Tightlining is one of the easiest ways to make your eyes appear naturally bigger. For this, you'll have to draw beneath your lash line along that sensitive, fleshy part of your lid that you’re probably terrified of touching. But with enough practice, it'll become second nature. And with tightlining, I've found that you only need to bother with your top lash line, since some of the residue from the liner will imprint on your lower lash line (from all that blinking we humans do), giving you a more natural look – as opposed to what it would be if you were to draw it on yourself. And of course, staying true to my aversion to black liner, pick a brown hue instead. If you have a tanner complexion, try a chocolate color. If you’re a bit fairer, try a taupe.

Tip 3: Enhance your eyes with neutral shadows. Learn to love the colors already on your face and play them up with complementary shadows. You should definitely try the Naked and Naked2 palettes by Urban Decay—their assortment of 12 neutral shades are great for making you look good without having to try too hard. A wash of one color does wonders, but you can use two to get that “sultry” eye other women attempt with layers of black liner. Here's how: Using a shadow brush, apply a dark bronze shadow to the outer corners of your eyes (just beneath the brow bones). Next, take a shimmery ivory or pearl and sweep it across your lids from the inner corners outward. This has a brightening effect that balances out the bronze. Combined, the two shades add dimension that makes your eyes pop, without looking too dramatic or too contrived.

Tip 4: Skip the fake lashes and curl instead. If long lashes aren't part of your genetic code, chances are you’ll end up looking nothing like yourself if you try to fashion the look with falsies—and where’s the good in that? As someone who wasn't blessed with the longest, fullest fringe, I like to keep it simple. My trick? Use a curler and clamp it down tight right at the lash line to give your lashes an almost-perfect fan shape. If you want to add a bit more length, clamp the curler again at the tip of your lashes; that’ll give them a bit more lift, making your eyes instantly bigger and brighter—in a natural way.

Tip 5: Use mascara sparingly. Mascara can be a must or a bust if not applied properly. For the best results that look natural and not clumpy, start with the wand at the lash line and wriggle it at the base first and then sweep it upward. Also, try applying mascara to your bottom lashes so as to open your eyes up even more, but do this with extreme caution. You don't want to end up looking like a 1960s go-go dancer. If your lashes aren’t black like mine, try a brown mascara. This tip goes along with my eyeliner philosophy: Use colors that mimic the hues that appear naturally in your hair and skin.

Tip 6: Experiment. I’ve learned most of my makeup routine from trial and error, and I encourage you to do the same! Only you know what’s best for you, so take the time to play around with different colors and techniques. Just remember, less is more.

Makeup Tips For Eyes Makeup Tips for Brown Eyes and Tricks Smokey Eye  Eyeliner For Blue Eyes Eyeliner and Mascara Tumblr Photo

Makeup Tips For Eyes Makeup Tips for Brown Eyes and Tricks Smokey Eye  Eyeliner For Blue Eyes Eyeliner and Mascara Tumblr Photo

Makeup Tips For Eyes Makeup Tips for Brown Eyes and Tricks Smokey Eye  Eyeliner For Blue Eyes Eyeliner and Mascara Tumblr Photo

Makeup Tips For Eyes Makeup Tips for Brown Eyes and Tricks Smokey Eye  Eyeliner For Blue Eyes Eyeliner and Mascara Tumblr Photo

Makeup Tips For Eyes Makeup Tips for Brown Eyes and Tricks Smokey Eye  Eyeliner For Blue Eyes Eyeliner and Mascara Tumblr Photo

Makeup Tips For Eyes Makeup Tips for Brown Eyes and Tricks Smokey Eye  Eyeliner For Blue Eyes Eyeliner and Mascara Tumblr Photo

Makeup Tips For Eyes Makeup Tips for Brown Eyes and Tricks Smokey Eye  Eyeliner For Blue Eyes Eyeliner and Mascara Tumblr Photo

Makeup Tips For Eyes Makeup Tips for Brown Eyes and Tricks Smokey Eye  Eyeliner For Blue Eyes Eyeliner and Mascara Tumblr Photo

Makeup Tips For Eyes Makeup Tips for Brown Eyes and Tricks Smokey Eye  Eyeliner For Blue Eyes Eyeliner and Mascara Tumblr Photo

Makeup Tips For Eyes Makeup Tips for Brown Eyes and Tricks Smokey Eye  Eyeliner For Blue Eyes Eyeliner and Mascara Tumblr Photo

Makeup Tips For Eyes Makeup Tips for Brown Eyes and Tricks Smokey Eye  Eyeliner For Blue Eyes Eyeliner and Mascara Tumblr Photo